Angularでコンポーネントを作ろう
2018/08/31
はじめに
Angularとは?という方はこの記事をご覧ください。
コンポーネントって?
Webページのパーツを再利用できる形にしたものです。
全てのページにヘッダーがあるとして、全てのページにヘッダーのソースコードがあったら修正が大変ですよね。
そこでヘッダーを全てのページで再利用できれば、修正作業を楽にすることができます。
前提
angular-cliインストール済
コンポーネントの雛形を作る
 > ng new testApp
  > cd path/to/testApp
  > ng g component test
なにが起きたの?
上記のコマンドを実行すると、こんなメッセージが表示されます。
installing component
  create src\app\test\test.component.css
  create src\app\test\test.component.html
  create src\app\test\test.component.spec.ts
  create src\app\test\test.component.ts
  update src\app\app.module.ts
読んでそのままなのですが・・(汗)
できたファイルの中身を見てみましょう。
src\app\test\test.component.css
src\app\test\test.component.html
この2つのファイルは作った時点ではほとんど記載がありません。
CSSにはコンポーネントで使いたいスタイル、
HTMLには使いたい要素を書いていきましょう。
src\app\test\test.component.spec.ts
コンポーネントのテストを書くファイルです。
src\app\test\test.component.ts
コンポーネントの本体です。
ここにイベントハンドラやサービスの呼び出し等を書いていきます。
import { Component, OnInit } from '@angular/core';

@Component({
  selector: 'app-test',
  templateUrl: './test.component.html',
  styleUrls: ['./test.component.css']
})
export class TestComponent implements OnInit {

  constructor() { }

  ngOnInit() {
  }

}
src\app\app.module.ts
作られたコンポーネントが追記されています。(declarationsの部分)
import { BrowserModule } from '@angular/platform-browser';
import { NgModule } from '@angular/core';

import { AppComponent } from './app.component';
import { TestComponent } from './test/test.component';

@NgModule({
  declarations: [
    AppComponent,
    TestComponent
  ],
  imports: [
    BrowserModule
  ],
  providers: [],
  bootstrap: [AppComponent]
})
export class AppModule { }
え、これだけ
コンポーネントを作るだけならこれで終わりなんです。
angular-cliのおかげで簡単にできました。
でもこれじゃつまらないのでログイン画面のモックを作りましょう。
app.module.ts
Formを扱うのでAngularのFormsModuleをDIしましょう
import { BrowserModule } from '@angular/platform-browser';
import { NgModule } from '@angular/core';
import { FormsModule } from '@angular/forms';

import { AppComponent } from './app.component';
import { TestComponent } from './test/test.component';

@NgModule({
  declarations: [
    AppComponent,
    TestComponent
  ],
  imports: [
    BrowserModule,
    FormsModule
  ],
  providers: [],
  bootstrap: [AppComponent]
})
export class AppModule { }
app.component.html
つくったコンポーネントのselectorを要素として記載します。
既存のソースは不要なので消してしまいましょう。
<app-test></app-test>
test.component.html
<div>

  <label for="id">ID</label>
  <input type="text" [(ngModel)]="id" id="id">

  <label for="pw">PW</label>
  <input type="password" [(ngModel)]="pw" id="pw">

  <button type="submit" (click)="login()">Login</button>

</div>
ポイントになるのは[(ngModel)]と(click)の部分です。
AngularではHTMLの属性を[](丸カッコ)または[](角カッコ)でバインディングの方向性を設定することができます。
ngModelはComponent⇔Viewの双方向バインディング、
clickはView⇒Componentの単方向バインディングを設定しています。
バインディングの表記と方向性をまとめると下記になります。
| 表記 | バインディングの方向 | 主な使い方 |
|---|---|---|
| (属性名) | 単方向 (View ⇒ Component) |
click, keyUpなどのイベントハンドラを設定するとき |
| [属性名] | 単方向 (Component ⇒ View) |
コンポーネントのプロパティ値をテンプレートの属性値として使いたいとき |
| [(属性名)] | 双方向 (Component ⇔ View) |
Viewでの変更とコンポーネントでの変更をどちらも扱いたいとき |
test.component.css
* {
  box-sizing: border-box;
}

div {
  margin: 100px auto;
  width: 80%;
}

label {
  display: block;
}

input {
  border: 0;
  padding: 10px;
  font-size: 1.3em;
  font-family: Arial, sans-serif;
  border: solid 1px #ccc;
  margin: 0 0 20px;
  width: 100%;
  -webkit-border-radius: 3px;
  -moz-border-radius: 3px;
  border-radius: 3px;
}

button {
  padding: 15px 50px;
  border: none;
  width: 100%;
  font-size: 1.3em;
}
スタイルは適当に見繕いました。プロジェクトで使うUIフレームワークがあればそのスタイルがあたるようにHTMLを書いていきます。
test.component.ts
import { Component, OnInit } from '@angular/core';

@Component({
  selector: 'app-test',
  templateUrl: './test.component.html',
  styleUrls: ['./test.component.css']
})
export class TestComponent implements OnInit {

  id: string = '';
  pw: string = '';

  constructor() { }

  ngOnInit() {
  }

  login() {
    alert('ID: ' + this.id + '\nPW:' + this.pw);
  }

}
IDとパスワード(ソースのidとpw)をコンポーネント側で受け取るために宣言しています。
この2つは双方向でバインディングしているため、テンプレート側で{{id}}や{{pw}}と記載してあれば入力と同時に値を表示することができます。
一番下のloginメソッドは、テンプレートのログインボタンが押されたときのハンドラです。今回はモックなので処理はalertのみですが、本来ならサービスに定義した関数を呼び出すなどの処理になるでしょう。
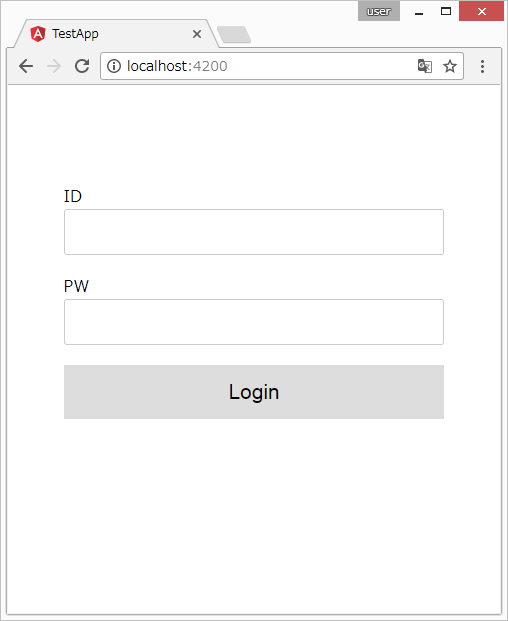
動作確認
> ng serve
上記コマンドを実行後、「localhost:4200」にアクセスするとしてください。
以下の画面が表示されるはずです。
補足
環境構築+この記事の知識だけで進めると、コンポーネントのソースコードがコピペ&コピペで修正作業が大変になってしまいますよね・・
AngularにはServiceという、ロジックと画面を分類する機能があります。
それについてはまた後日!!
